Getting started with Raspberry Pi 4

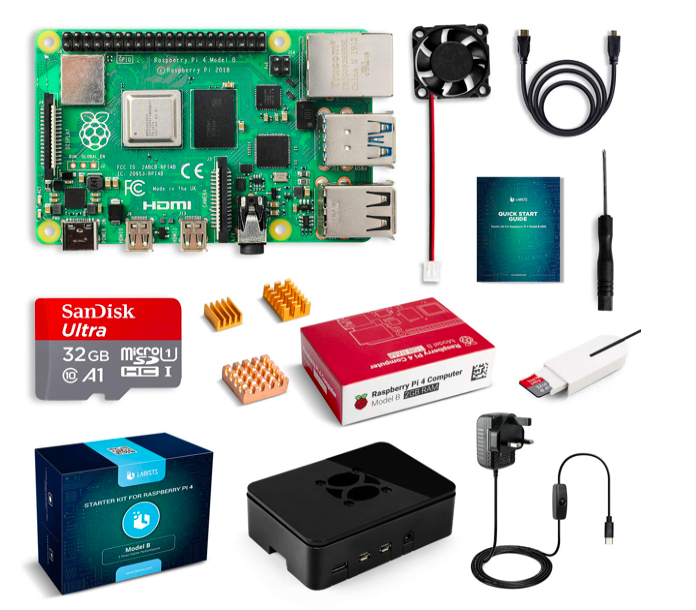
For my birthday in November 2019 I was given a Raspberry Pi 4. I had mentioned that I thought one would be interesting when I retired and had then forgotten about the idea. I did not have any particular plans, but still fancied having one and so went ahead. There are several varieties of Raspberry Pi and went with the relatively safe option of ordering the most expensive variant in a starter kit. The kit that we ordered was the LABISTS Raspberry Pi 4 with 4Gb of ram, power supply, case with fan, micro HDMI cable and 32 Gb card with NOOBS pre-installed. The kit was £89.99, which is probably slightly more than buying all the parts separately. The most similar one currently listed is 2Gb version at https://www.amazon.co.uk/LABISTS-Raspberry-Starter-Motherboard-Preloaded/dp/B07Y8B321S/

The LABISTS Raspberry Pi starter kit

Installation was fairly straightforward. One issue was getting the display to appear on the TV. It seems that an adapter ordered at the same time to connect two HDMI connectors was faulty :-(. There are also two HDMI ports on the Pi and it looks like it matters which you choose. The picture then worked even if it was very small – as its scaled to the 4K TV. Perhaps best to install on an HD screen rather than UHD. After that though all went smoothly using NOOBS and installing Raspian.

This kit case came with a case and fan. Reading in various places the one downside of the Pi 4 is that it runs hot. Plugging in the fan meant connecting it to the 5v and GND on the GPIO socket with the result that it ran continuously. This therefore gave me my first project – to find a way to create a temperature sensitive fan …

WordPress installed!

Picture of the WordPress login
My very own wordpress login

I have now installed WordPress so that I can make a diary of the actions I am doing and remember what I have been upto!

Installing WordPress was fairly straightforward. As you would expect there are several post about how to do it. However there still remain a few catches. For example, mysql is no longer in the repositories for installation on Raspberry Pi and so the instructions at https://www.makeuseof.com/tag/host-wordpress-raspberry-pi/ could not be followed line for line. On the other hand the instructions at https://pimylifeup.com/raspberry-pi-mysql/ had been updated to use the correct database and so use mariadb in place of mysql, but missed out a minor step to restart the apache2 server after the installation of php-mysql.

Another thing that caught me out was the URL for the site. This started as localhost. This was fine for looking at it on the Raspberry Pi, however links and images did not work when viewed from other machines. I then put in the URL – 192.168.1.231. That seemed ok at first, however when I put the SD Card in another Raspberry Pi (the Pi Zero W running the Christmas Tree) the URL changed to 192.168.1.232 and again links were broken. I could not easily fix that as the login was also broken (there is advice about ways to deal with this at https://wordpress.org/support/article/changing-the-site-url/ ). It was simplest to reinsert the SD card into the Pi 4 and then login and adjust the settings again. So now set to have the URL http://rapsberrypi – not sure that is the end of the issue though! [This paragraph added 4 January 2020].

A bit more tweaking – I have now moved the WordPress installation to its own directory /var/www/html/wordpress. I followed the steps on https://wordpress.org/support/article/giving-wordpress-its-own-directory/ and also set the site URL to http://raspberrypi.home [6 January 2020]. New update [20 February 2020] now moved onto a static IP with our new provider Vodafone so have a public URL – www.mcandrewmk.co.uk and so needed to again change URL following instructions at https://wordpress.org/support/article/changing-the-site-url/ (though because of using a subdirectory had to set the WP_SITEURL to have /wordpress at the end.)

Anyway WordPress is now up and running! I will now try to remember to blog each time I do something interestingish. I also should do some retrospective bloggin about various things already done i.e.: